Showing posts with label pre-school activity. Show all posts

Monday, January 25, 2010

Homemade Valentines t-shirts for kiddos by kiddos


Let me first admit, these shirts are two stolen ideas put together. The first is from my extremely creative sister who made adorable name shirts with bias tape for the youngest twins first birthday. I just love the originality! The second is the painted doily idea from Ashley Ann Photography blog. I made a tote bag from her tutorial that has quickly become my favorite from her instructions. Thanks Paige and Ashley Anne!


With that said, I feel ready to start with some Valentine's Day shirts:


1. Apply a little spray adhesive to the back of the doily and stick it to the shirt. Let the kiddos sponge on the paint. No matter how many time I let them know the center didn't have to be covered, they insisted in painting the whole thing. :) My kiddos used a sponge brush, but any type of brush would do the job.  Put a little cardboard in the shirt to ensure the paint stays only on the front side.

Since boy's don't do doilys we modified the project for the only male of our trio. Using construction paper we cut out hearts and applied spray glue to the bottom side and set him loose.

2. Peel the doily off (the shirt looked like this). As you can tell there are a few imperfections around the edge, but I think it just adds to the childish charm.

Below was my first attempt at he Paige bias tape letters. This time the mistake didn't add so much charm. :) Turns out I should have gotten a tutorial from the creator before I tried to copy. :) Try number two was much better, but still look forward to having Paige show me a few tricks I think she has up her sleeve :)


1. Using tailor's chalk draw the letter or name you plan to add.
2. Fold bias tape in half (or purchase thin bias tape) and slowly stitch the tape over the chalk using a straight stitch.

The boy's shirt is read to wear after painting. If you want to stick with paint only for the girl's shirts, use the construction paper method to add a heart in the middle of the doily once it is dry.

I can't wait to see all the variations you come up with. Please leave me a comment with a link to any new creations your family enjoyed making. :) Happy stenciling, sewing, and Valentine's Day.

Saturday, October 3, 2009

Noodle in a bottle: the repost

This is a re-post of a quiet activity that was intended to be for the little ones, but everyone had a blast. I was inspired by the loves school blog and we added our own twist.
The little ones each got pan to catch the broken noodles with their goal being not to break any noodles. My youngest son is in need of gentleness training. The boy is a bull in a china shop. LOL Then they each got noodles and a water bottle. To add a challenge we added tape to the top of the bottle. Very simple, very fun! The big boys decided it was a building project and took it in a direction that I could not have planned.
This activity passed the easy set up, long playtime, and quick clean-up test. When I am looking for/evaluating a kiddo activity I look for a quick & easy set up, a long playtime, and quick & easy clean-up. If the activity takes too long to set up, my kiddos have lost interested or gotten into mischief before we start. If the clean-up is too intensive it gets left out until the kiddos go to bed...not good! :) So if your time to set up + your time to clean up is less than half the playtime the activity makes the cut at my house.

Noodle in a bottle: still going strong

We all need those little "standby" actives. You know the ones for those times. Those times when we count the seconds until daddy come home, those times when everyone is ready to go but we still have an hour to kill, those times when I have just one more thing to do but the kids don't have anything ;) to do. Well, this is one of our standby.
It's very simple...Noodles!
Yup, just noodles. Each time they get 'em out a new activity is created because the kiddo's imagination dictate the fun. On the bottle shelf of our pantry (just above the recycle/inspiration bin) sits a few plastic containers labeled "Kids Only"! One of them is filled with pasta of all shapes, sizes, and colors. Under the microwave is the "Kids Only" drawer filled with all kinds of kitchenlike treasures. The kids mix and match from the Kids Only containers, recycle/inspiration bins and Kids Only drawer.
No planning, easy clean-up, fine motor stills, imagination, entertained kiddos...works for me.

Saturday, August 29, 2009

How to: homemade bag tag ... you can do this!

When it's time to send them into the classroom with their big girl/boy backpack it's fun to add a little touch of love on the front.We have joined a co-op that meets one day a week, so I tagged each of my kindergartners with a little extra label of love. This project can't be easier! 
1. Find a design you like or hand write your kiddo's name (better yet, let your kiddo write their own name) on a piece of card stock. The size doesn't matter, but I like the look of 4inch by 2inch tags. For the diaper bag tag I used the same design for both sides, but the kinder tags I used scrapbook paper on the back.
2. Cut both sides of your tag the same size. Set the two pieces (blank sides touching) inside a self laminating paper or pre-cut bag tag, follow the directions and peel off the excess paper while sealing the tag/page.
3. If you have used the self laminating paper cut around the label (leaving at least 1/4 inch clear laminate around paper. Use a hole-punch and cut a hole in the tag, and add string/ribbon. The tags hang a bit nicer if you fold the string in half and insert the loop side thru the punched hole and tread the other end  thru the loop. If you have used the pre-cut bag tag you can skip this step and just add the enclosed plastic strap.4. Hang in on your kiddo's bag and watch as their face lights up knowing that Momma labeled them with love. 
These make a great label for any type of present (especially christmas). What grandma could resist having a one of a kind baggage tag hand written by her grandkiddo? If you are using it as  a luggage tag, I suggest you make it a bit smaller to increase the durability and reduce the chance of it getting torn off while the luggage is being moved.
Happy Labeling..I was going to say tagging, but that has a whole new meaning. :)

Tuesday, August 25, 2009

How to: bleach design t-shirts..you can do it!

It doesn't get much easier than this! The kids loved creating their own special shirt. Although we followed the same steps, each shirt has it's own look.
Supply list for this simple kiddo craft: Freezer paper, Scissors or razor blade, Pencil or pen, Stick-on letters (if you want words on your shirt),  Iron, T-shirt (any color but white, but darker colors work the best), spray bottle with 80% bleach 20% water, container for rinsing shirt
1. Allow the kiddos to draw a design for the shirt on freezer paper (the non-wax side)
2. Cut out the design and iron it onto the shirt (wax side to shirt). Once the design in cool, allow them to add sticker letters if desired. 
(not sure why he chose "story lover", but glad he loved it!)
3. Lay the shirts out in an area that is safe to spray bleach. Make sure your container (or bowl) of clean water is ready so you can dip the shirt after you spray. Spray the shirt with a 80% bleach/20% water solution. I used an old no more tears bottle that had been cleaned.
4. The longer you leave the bleach on the shirt the lighter the shirt will become. The more bleach you use the greater the contrast. This one had a lot of bleach and sat for about 1 minute before rinsing. When you have the desired color change dip the shirt in the clean water and rinse throughly.
5. Peal off your design and letter and allow it to dry in the sun. This shirt we used less bleach and only let it sit for about 30 seconds. As it dries the color change will be more evident (see picture below for final product).  
6. If desired turn the shirt over and add another design or just mist with bleach solution to match the color of the front. Once you dip in the water you can allow it to dry in the sun or wash it immediately. I used a color catcher when I washed all five shirts together. After the first wash the smell of bleach was still strong, but after the second wash and dry they were ready to wear.
7. Let the kiddos enjoy their new creation.
This is great for old t-shirts that have seen better days, and I just love this twist on the same basic idea.

Thursday, July 30, 2009

charting progress...

I love charts! Not because they look cute, but the peace they bring my household. We are currently enjoying the tea party chart. There are a few reasons this chart has worked so well for us. The first is that the rewards are quick. My kiddos don't have the attention span to work six months on a big prize. They only have to earn seven stickers for each part of their reward. The kiddos also go "outside the lines" and use their stickers at bartering tools with each other. I will clean your room for you if you give me two of your stickers, etc. Secondly, the kiddos feel like they are part of a team. Since they are all working toward the same reward (tea party) they have enjoyed talking and planning their contribution. Noah is very excited about cupcakes while Abby can't wait for brownies. They have been very encouraging to each other,"Becca, just one more sticker and I will help you make a cake." Most importantly, I have a easy reward/discipline. When they get in the car, buckle up, and are kind to one another they each get a sticker. But, if I hear an unkind word I will remove one of their hard earned smiley face stickers. We don't set up clear guideline about what constitute a sticker, so the kids will often ask if I _______ can I get a sticker? We don't have a set time frame for each chart, we just make a new one when they loose interest. Generally we have a new type of chart every other month. Some stick around longer than others, we still uses the reading club chart that we started back in November. I make my charts in photoshop, because I like the way they look. This is a blank, ready for your imagination and pen to make it fit your household.Happy Charting!!

Monday, July 13, 2009

50 foot slip-n-slide with sling shot

I have been envisioning creating a 50 foot slip-n-slide in our yard. Saw one on Jessica's blog with a rope to sling shot the kiddos at blistering speeds down the slip-n-slide. Oh this is something we have to try!! :) 
So I stop at the local big box home improvement and pick up a big plastic tarp and start calling/emailing friends last night. Well, I bought the wrong tarp, I couldn't find the stakes, but we made it work. When we make it again, this is what we will use:
  • 1 or 2 large plastic tarp (at least ten feet wide)- the kids could all make it to the end of our fifty foot slide
  • stakes to anchor it to the ground
  • 2 or 3 bottles of  baby soap (so it doesn't hurt their eyes)
  • hose and water (we used a spinkler and hose to keep it nice and wet)
  • rope or elastic band to sling shot the kiddos
The preparation is easy, lay out the tarp and stake the edges down. We used wood but, stakes would have worked better. Pour on the baby soap to make it extra slippery, then add water. Make sure the slide stays nice and wet.
Be careful and have fun. This is a great group activity, can you already see your small group, moms group, or close friends on he slide. Jessica said a friend used it for  birthday party. Oh fun!

Friday, July 10, 2009

marking their territory...

A proper garden must be outfitted with plant markers! With the idea of fashion over function, few of these markers actually label plants. The kids had fun creating these wooden markers to adorn the squash, lettuce, sweet peas, spinach, and sweet potatoes. Since they had fun, these are the best plant markers in the whole world in my eyes. If you are in Texas this is a great website that helped with our plant selection.

Monday, May 11, 2009

sew young?

Q: What is the right age to begin allowing kids to sew?
A: There are many sewing activities that kiddos can enjoy as early as two years old. I began allowing my kiddos to machine sew(with supervision) at age 6. Here is what the progression looks like at our house:
Age 2-3: Card Sewing - Cut out a cardboard shape, using a hole puncher go around the edge and punch holes approximately 1/2 inch apart. Tie length of string to around one hole and the edge to secure it to the cardboard. To help little fingers be successful I wrap the sewing end with clear tape. I love using food boxes from the recycle bin. To lengthen the activity let them color the card before you add the holes. Don't worry about the way they sew (across the card, skip holes, etc), just enjoy!
Age 2+: Fabric Markers & Sewing - If your kiddo can draw they can participate in this fun project. Iron butcher paper (shiny side down) to the back of any natural fabric. I used cotton for this project. After protecting the table with a tablecloth, let the artistic kiddo draw. Follow the directions on the marker box to heat set the design (if needed). Using their design the list of projects are endless! My oldest used two of his designs to make a pillow. A few years ago I used the same technique to make the cover for a "Grandparent's Journal". We placed a blank journal along with a list of questions that we knew the kids would enjoy reading someday. We gave it as a Christmas present, but we got the real gift when it came back with so many amazing family stories.
Age 3+: Hoop sewing - Place the fabric in the embroidery hoop and secure it in place. For the littlest kiddos I use burlap with a yarn (dull) needle. Using embroidery tread, tie the string to the needle (prevents retreading over and over again), and tie it to the material. Just let them have fun! As their skill increases, change the material and needle type needle as appropriate. Learning the embroidery stitches may begin as early as 6. Just make sure the introduction of stitches doesn't limit creativity. This is a design on felt that my eight year old kiddo created using  hoop sewing. You can see he added a bead (the eye) to embellish the design. He later added velvet to the back to make it into a pillow to give to his cousin.
Age6+: Machine Sewing - I love starting with pillowcases or kiddo-created projects. For more detail on introducing the sewing machine check out an earlier post on cleverkiddos.com
Happy Sewing!

Friday, May 8, 2009

What makes music?

To quote elmo, "Everything makes music!" These are some of our favorite homemade musical instruments. 
1. Box with a circle cut out of the front with rubberbands.
2. Container with lid filled with beans or pasta.
3. Anything that can be hit. With a new baby at the house we have found a lot of new uses for formula cans.
4. A terrible ruckus machine. I had seen something similar in a book called The creative family.
May your day be filled with the sweet sound of music!

Thursday, April 23, 2009

for the love of reading...

In our family, it more important to love to read than to read well. Don't get me wrong, we strive for excellence in all we do, but we believe if we can foster the love, the skill will naturally follow. The boys were starting to get a bit legalistic about the number of pages they read each day. So to entice them to want to read extra books we created a reading club. The older boys helped me come up with the rules. I had to think about how we adapt them to four year olds, so everyone could be involved. Here is what the Kelly reading club looks like:
Each time they read 4 book, they can choose a dessert at home. If they save up and read 6 books they can plan a family dessert for the whole family. If they choose to read 7 books they get to have a special dessert night with mommy or daddy. To encourage reading to siblings when the big boys read to the little ones, the book counts for both kiddos. We read to the kiddos a lot, but lately I realized we are skipping a lot of our favorite younger books for the 4 year olds. This program encouraged me (because they asked) to read their books too.
We choose dessert (for now)because the kiddos love to cook, but any reward will do.

Wednesday, April 22, 2009

Straw Painting

Here is a fun twist on painting. Arm the kiddos with a straw, small cup of watered down paint, and sponge. Make sure you don't put more watered paint in the cup than you are willing to have spilled. Have the kiddos dip the sponge in the watered paint and place in on the paper. Using the straw, blow the paint into a creative piece of art. 
Enjoy!

Wednesday, April 15, 2009

Noodle in a bottle...

A great quiet activity for kiddos of all ages. Although I intended it to be for just the little ones, those clever kiddos had other ideas. I was inspired by the loves school blog and we added our own twist
The little kiddos each got a pan to catch the broken noodles with their goal being not to break any. My youngest son is in need of gentleness training. The boy is a bull in a china shop. LOL Then each kiddo got noodles and a water bottle. To add a challenge, we added tape to the top of the bottle. Very simple, very fun! The big boys decided it was a building project and took it in a direction that I could not have planned.
This activity passed the easy set up, long playtime, and quick clean-up test.

Thinking outside the box...

Here is a very inexpensive activity that all my kiddos LOVE. Collect a bunch of boxes, dig in your recycle bin or head to your favorite warehouse store (we like sams). We got two carts full of boxes for only $1.88 (the price two fountain drinks).... pretty good. The workers are usually very helpful and enjoy helping the kiddos fill the cart. 
Head to the grass and get out your paints, brushes, and paper plates (for the paint). If you prefer the kiddos to be a little less painted coat them with lotion so the paint doesn't "stick" as well. 
Let the kiddo's imagination run wild. Some of our favorite creations range from a grocery store to big baby crib made from a watermelon display box. 
Clean up is easy, fill a bucket with water, add soap, wipe with papertowels, and allow plenty of outside playtime to ensure they are dry.
This "outside the box activity" works well with a groups or makes a very clever birthday party. Just make sure you have plenty of paint shirts on hand, or let them make their own paint shirts as a party favor. White t-shirts with a "My Kiddo's 4th Birthday Party" iron on, splashed with paint during the party make the perfect take home gift. I love SouleMama's idea for an art party too. The aprons are SUPER cute!! 
Our favorite "outside the box party" was when we moved into our new home. After a lot of unpacking, the box party was a special kid-friendly housewarming party! 

Monday, April 13, 2009

Egg Carton Fun

Save those egg cartons....
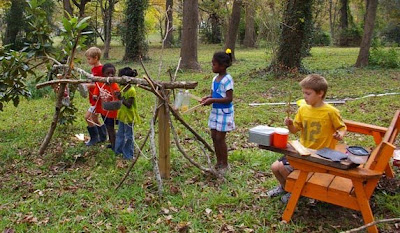
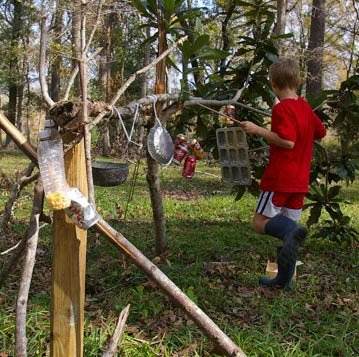
So many fun games are just waiting to be created. We enjoyed a matching game with letters, but  numbers, colors and patterns are just a few of the endless possibles. I used bits of felt, but I think paper would have worked a bit better. The kiddos loved using it as a target as well as a matching game....those clever kiddos, I would have never thought of that. 

Thursday, April 9, 2009

Easy painting with kiddos...

Painting can sometime be an intimidating activity. Visions of your children looking like these may be enough to make your blood run cold. With a little preparation painting can leave little clean up. Painting outside is my first choice, but when done right inside can be just as easy. Preparation is the key, these are the simple step I use to prepare:
  1. First I have a tablecloth to cover the table.
  2. Place a bag of wipes and a small bottle of lotion on the table. I store the table cloth, lotion, and wipes in a drawer next to our table so they easily accessible.
  3. With the table covered I get my tackle box of paint. Paint-shirts, paper cups, disposable plates, paint, and brushes are stored in one tote. Putting the paint on a plate keeps is contained and gives a great pallet for mixing. Best of all I toss it when I am finished.
  4. Just before we start painting I lotion up my little artists hands. This works very well with ink projects too. Hands are so much easier to clean up if lotions is used first.
I let the kids choose their colors for painting, fill their plate and let them get started. Once they begin I place a small (very small) amount of water in their cup and set it on a napkin. I let them paint as long as they are interested, but before they get bored, I start talking about what we do when before we leave our table. As long as they take off the paint shirt and wipe their hands (or have them wiped) with a baby-wipe they are free to get down. We have a line with clips hung in our garage that works well drying the art created outside and prevents them from being blown away. I place the paint back in the tackle box after each squirt, so all I need to do is place the art in a safe place, put the napkin in the cup and toss the paper products. A quick rinse of the bushes and a roll of the tablecloth completes our art project.
The pictures above were taken when oldest son was young. These are a few of his friends that had come over to play. After a good coat of lotion, they took off clothes that couldn't get paint on them and replaced them with ones that could. I gave them each a color and they covered themselves, the paper, and each other with it. I had a roll of newsprint unrolled in the back yard and they walked, crawled, ran, patted, and rolled on the paper. They had a blast and after a spray with the hose and quick towel dry they were ready for the next activity. I let the sun dry the painting and sent home a section with each boy.

Wednesday, March 25, 2009

color sorting and a snack...

These trays are designed to make ice cubes that fit inside a water bottle, but they are perfect for sorting. Great for learning colors, patterns, fine motor skills, pouring, and maybe a little snack. A fun inside activity for children 2 - 6 years old. Two year olds do a little more eating while the six year olds tend to get a bit more creative.
This kid-friendly activity works well while I am working in the kitchen. They are entertained in their seats and I can get the dishes loaded without tripping over my little ones.
Color Sorting Cereal Supply List:
water bottle ice cube tray OR regular ice cube tray
scoop or spoon
colorful cereal
bowl

Tuesday, March 24, 2009

Graham Cracker Trains

Never attempt this one on an empty stomach. (LOL) The kid's imaginations were rolling as we made these "gingerbread" creations. This activity is great for fine motor skills, sensory, and of course the sweet tooth. After protecting the table with paper each child gets a plate and a spreader. A popcicle stick or butter knife work well to spread the icing. Give them a little icing, access to the graham crackers and let the fun begin. For a bit of extra fun I let them squirt the icing. If you don't have a decorator tip on hand just place the icing in a zip lock and snip a small hole in one of the corners. Make sure you keep a few wipes or napkins on hand because along with this fun comes messy hands. Shopping List: 1 can icing 1 box graham crackers 1 box graham cracker sticks Supplies: Plate
zip loc bag scissors popcicle stick OR butter knife