Monday, July 6, 2009

Birthdays...

I just love birthdays! What a special time to enjoy looking back, looking forward, and savoring today. We have a few traditions that have developed over the years. 
1. We give the kids 
a choice on their birthday to either A: have a big blowout birthday party with all their friends, B: take a weekend trip with on their own with one parent, or C: take a weekend trip with the entire family.  This
 starts around age 4, but is
 really enjoyed at age 5+. The kids talk about it all year and usually change there minds often and dream big. Our youngest daughter invites and disinvites other family members to her birthday
 celebration (including her twin)throughout the year depending if she likes their behavior or not. 
2. Each of the kids enjoy
 making something for the birthday kiddo. Gifts range from drawings to sock puppets, but each one is filled with love and thoughtfulness. The exchanging of these gifts is
 usually a very special and often touching time.
3. The birthday fairies come to decorate. Either the day before or while they sleep the other kiddos (with help) decorate the room of the birthday kiddo. We
 keep a decoration box that the kiddos usually pick from, but when parents are unprepared a roll of toliet paper and construction paper chains work well. 
4. Birthday Princesses/Prince wear their crowns. The girls have special birthday tiaras that they wear on their special day.
 Since one of the girls has a twin brother we have a special crown for him as well. :) 
5. Leave the icing off. When serving birthday cake we leave the icing off and serve each slice with a scoop of icing and a dash of sprinkles.
 That way each kiddos has the fun of decorating their slice and no arguments over who gets what piece.  Everyone wins, not to mention one less job for mommy on the special day.
6. Sleep where you want. The birthday kiddo gets to choose where they sleep after the big day. They are usually accompanied by at least one sibling and talking is usually not kept to a minimum. We made the mistake of doing this the night before the birthday but after one grumpy birthday boy we decided this was a better way to end a special day.
We just celebrated our 30th kiddo birthday last week. I can't wait to see what the birthdays look like after 30 more, according to my calculation that should be in about 4.5 years. 

Wednesday, July 1, 2009

Cream Cheese Brownies

Yummy! This is one of our favorite deserts. 1 pkg. Super Moist Devil's Food Cake Mix
8 ounces cream cheese, room temp.
1 egg
1/2 cup sugar
1/2 cup chocolate chips
White and Chocolate Frosting (optional)
Heat oven to 350 degrees. Grease and flour a 15 1/2 X 10 X 1 jelly roll pan OR 9X11 pan. 9X11 takes a little longer to bake. Prepare cake mix as directed on package. Pour batter into pan. Mx cream cheese, egg, sugar, and chocolate chips together. Drop by spoonfuls into batter. Cut through with butter knife to get marbled effect. If you want a few extra chocolate chips sprinkle them on top. Bake until toothpick comes our clean 25-35 minutes. Cool and drizzle optional white frosting and then chocolate frosting. Cool and cut into squares. This recipe freezes well but, doesn't last long in our freezer. (ha ha) I usually at least double the recipe. This was a big hit with kiddos and adult alike. For one of the girl's tea parties, I added a little red food coloring to the cream cheese mixture so it was pink. :) Pink and chocolate, does it get any girly girl than that? Enjoy!!

Saturday, June 27, 2009

cooking with kiddos...

Cooking with kiddos is big fun at our household. Sometimes so many little fingers (and spills) can be frustrating but these rules help me enjoy.
1) Kiddos help when the food is for our family. If I want something to look just right or taste the way it should I don't ask for kitchen help. 
2) Before we start we have all the ingredients on the counter and each child gets to choose their special ingredient. They are responsible for that ingredient: holding, pouring, measuring, stirring, cleaning up, etc. The unchosen ingredients are added in a rotation or by a parent.
3) Never sweep the floor before kiddos cook...the dirtier the better. That way I don't mind if they spill a bit, after all I needed to sweep anyway.
4) A little saran wrap on the counter or table goes a long way.
5) Special cooking apparel is so fun!
6) The time together is worth way more than the resulting treat/meal.
Today we made cookies. I love doubling the recipe so there is plenty of dough to freeze. Just wrap a "log" of dough in saran wrap and freeze. Try to get it as smooth as possible so once the dough is frozen it is easy to unwrap. Just slice and bake once the wrap is removed. I love having cookies ready at a moments notice. Great for a special snack or just to cover of the smell of too many stinky feet in the house. :) 
Enjoy!

Monday, June 15, 2009

Tasty pork chops...

This is one of our family favorites. It is so easy and my kiddos love to help. I always make extras to freeze.:)
Cranberry Pork Chops
12 thick cut pork chops (with or without bone)
2 small bottles of catalina salad dressing
2 cans of cranberry sauce (I like the whole cranberry sauce)
2 packets onion soup mix
Spray bottom of casserole dish, and place pork chops in a single layer. Let the kiddos mix all the other ingredients and enjoy letting the little hands spoon the mixture over the chops. Bake at 350 for 40 minutes for boneless or 50 minutes with bone.
If you are freezing them line a cookie sheet and lay pork chops in a single layer. Let the kiddos mix all the other ingredients and enjoy letting the little hands spoon the mixture over the chops. Freeze them for appox. three hours (on until they are firm) and place in a ziploc. Remove as much air as possible and freeze. Label: Bake at 350 for 40 minutes for boneless or 50 minutes with bone. Thaw the pork chops in the fridge overnight before cooking. 
Enjoy!!

Wednesday, June 10, 2009

Sew simple pillow...your kiddo can do this

I found four placemats for $3.00 and couldn't wait to see them on my girl's bed. No, we don't set the table on our kiddo's bed, we turned them into pillows. I made the first two and my oldest made the  third one. It took about 10-15 minutes and it couldn't be simpler! Using a seam ripper to take a few of the side stitches out. We recycle old pillows by re-using the stuffing for new projects. Once the pillow is stuffed hand stitch (like we did) or machine sew a few stitches to close the hole. Enjoy!
Note: not every placemat will work for this craft, just make sure you look at before you start taking it apart. :)

Monday, June 8, 2009

finger paintin' good!

Warm day, kiddos in clothes that I don't mind painted...sounds like a perfect time to finger paint. They worked together on this masterpiece.  I think I may have enjoyed hearing their imaginations run wild as much as they enjoyed painting.Fingerpainting is simple at our house. You fingerpaint, you play in the water, you dry in the sun THEN you come back inside. :)

Monday, June 1, 2009

Nighttime reading

We just got new beds for the trio. They were simple beds from Ikea, but I just love the way they turned out once I added a book sling. Now, as they are tucked in tight each night they have a library at their fingertips.  The bookshelf is very easy to make, don't nudge your hubby. LOL Girls can use tools too! I used 1X4 inch pine for the sides and 5/8 dowels for the middle. Start by cutting the 1X4 pine to the desired height of your bookshelf. I cut a curve on the top to make it look pretty. :) A jigsaw works well and is very easy to use. Cut two 1X4 brace pieces the width of your desired bookshelf minus the width of your sidepieces. (48.5-1.5inches in my bookshelf). Cut your 2 dowels to the desired width of your bookshelf - one width of your side piece. (48.5-.75 inches in my bookshelf)
The second step is easy. Sand all of your 1X4 pine pieces. The smoother your wood, the less splinters in little hands. Take your time and you will appreciate the results.
The next step creates a place for the dowels to fit into your side pieces. Using a drill bit(pictured below) the size of your dowels drill half way thru the side piece. You decide the location of the the holes. The sling will fit onto the dowels to hold the books in a later step.
Simply nail or screw the pieces together. Pre-drill the holes for all of the screws that you are using.  A carpenter's square helps to keep the shelf square. Use screws on at least one side of the shelf so it can be taken apart to add the sling and later storage.
A coat of paint has the frame ready to install. The sling is very easy. One piece of fabric two inches wider than your desired sling and a length equal to twice the sling width plus 12 inches. Sew two loops or pockets for the dowels to fit inside. Make sure the top pocket is long enough to ensure the good side of the fabric shows on the front side. Happy reading!!

Friday, May 15, 2009

Banana Bread

What kiddo can resist the squishy fun of mashing up bananas? This is our favorite recipes. Oh (big inhale) the smell is so delightful!  I hope your family enjoys it as much as ours! You may want to double the recipe. :)
2 1/2 cups flour 1 1/2 tsp. baking soda 1/2 tsp. salt
3/4 cup softened butter
1 /2 cup brown sugar
2 eggs
7 ripe bananas (smashed by kiddos)
1 tsp. vanilla
1 cup nuts or choc chips (optional)
Preheat to 325 degrees. Grease 2 loaf pans. In medium bowl  combine flour, soda, and salt; set aside. In large bowl cream butter and sugar with and electric mixer. Add eggs, bannanas, vanilla; beat at medium speed. 
Add flour mixture & optional mix-ins then blend on low until combined. Do not over mix.
Bake for 60-70 minutes. Enjoy the smell as it fills your house. :) Let cool for 10 minutes. Freeze one loaf for a yummy treat later.

Monday, May 11, 2009

sew young?

Q: What is the right age to begin allowing kids to sew?
A: There are many sewing activities that kiddos can enjoy as early as two years old. I began allowing my kiddos to machine sew(with supervision) at age 6. Here is what the progression looks like at our house:
Age 2-3: Card Sewing - Cut out a cardboard shape, using a hole puncher go around the edge and punch holes approximately 1/2 inch apart. Tie length of string to around one hole and the edge to secure it to the cardboard. To help little fingers be successful I wrap the sewing end with clear tape. I love using food boxes from the recycle bin. To lengthen the activity let them color the card before you add the holes. Don't worry about the way they sew (across the card, skip holes, etc), just enjoy!
Age 2+: Fabric Markers & Sewing - If your kiddo can draw they can participate in this fun project. Iron butcher paper (shiny side down) to the back of any natural fabric. I used cotton for this project. After protecting the table with a tablecloth, let the artistic kiddo draw. Follow the directions on the marker box to heat set the design (if needed). Using their design the list of projects are endless! My oldest used two of his designs to make a pillow. A few years ago I used the same technique to make the cover for a "Grandparent's Journal". We placed a blank journal along with a list of questions that we knew the kids would enjoy reading someday. We gave it as a Christmas present, but we got the real gift when it came back with so many amazing family stories.
Age 3+: Hoop sewing - Place the fabric in the embroidery hoop and secure it in place. For the littlest kiddos I use burlap with a yarn (dull) needle. Using embroidery tread, tie the string to the needle (prevents retreading over and over again), and tie it to the material. Just let them have fun! As their skill increases, change the material and needle type needle as appropriate. Learning the embroidery stitches may begin as early as 6. Just make sure the introduction of stitches doesn't limit creativity. This is a design on felt that my eight year old kiddo created using  hoop sewing. You can see he added a bead (the eye) to embellish the design. He later added velvet to the back to make it into a pillow to give to his cousin.
Age6+: Machine Sewing - I love starting with pillowcases or kiddo-created projects. For more detail on introducing the sewing machine check out an earlier post on cleverkiddos.com
Happy Sewing!

Friday, May 8, 2009

What makes music?

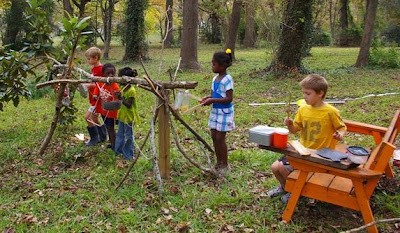
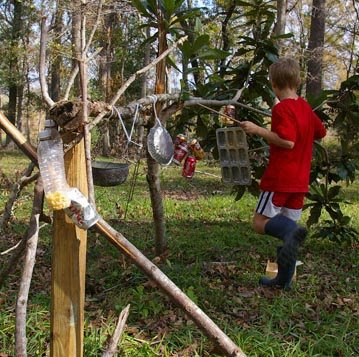
To quote elmo, "Everything makes music!" These are some of our favorite homemade musical instruments. 
1. Box with a circle cut out of the front with rubberbands.
2. Container with lid filled with beans or pasta.
3. Anything that can be hit. With a new baby at the house we have found a lot of new uses for formula cans.
4. A terrible ruckus machine. I had seen something similar in a book called The creative family.
May your day be filled with the sweet sound of music!

Monday, May 4, 2009

Getting a grip on dinner...

When the clock strikes 4:00 and dinner isn't "in the works" restaurants begin looking more appealing than they should. Back in the day when we had five little ones three years old and under, necessity required that I think about dinner before that daunting "4:00 'til daddy gets home" window. I am very passionate about my meal system because it has had such a positive impact in my life. My sweet friend Alyson took time to start me on the right path in the kitchen and for that I am forever grateful. There are a few basic truths that I built my meal system on: 1. It isn't much more work to double or triple a recipe that I am already making. 2. Some nights all I want to do is boil water or open the oven door but still have a great meal 3. Well planned meals make me feel successful as a wife and mommy 4. When I am using my meal system I cut my grocery bills by about 50%!! The calendar, shopping list, and recipes work together to make it oh so easy. This is the calendar for the first two weeks of the six week program: Coming Soon: shopping list, recipes, and extras

Thursday, April 23, 2009

for the love of reading...

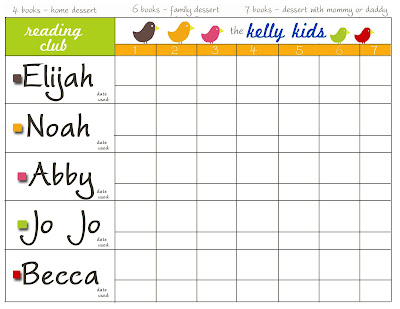
In our family, it more important to love to read than to read well. Don't get me wrong, we strive for excellence in all we do, but we believe if we can foster the love, the skill will naturally follow. The boys were starting to get a bit legalistic about the number of pages they read each day. So to entice them to want to read extra books we created a reading club. The older boys helped me come up with the rules. I had to think about how we adapt them to four year olds, so everyone could be involved. Here is what the Kelly reading club looks like:
Each time they read 4 book, they can choose a dessert at home. If they save up and read 6 books they can plan a family dessert for the whole family. If they choose to read 7 books they get to have a special dessert night with mommy or daddy. To encourage reading to siblings when the big boys read to the little ones, the book counts for both kiddos. We read to the kiddos a lot, but lately I realized we are skipping a lot of our favorite younger books for the 4 year olds. This program encouraged me (because they asked) to read their books too.
We choose dessert (for now)because the kiddos love to cook, but any reward will do.

Wednesday, April 22, 2009

apron skirts for girls...

I wish there was a way to bottle the feeling of sewing for your daughter or capture the smile of a sweet girl as they twirl in their homemade skirt. If only I could bottle that and give someone a taste, I believe we would be stitching that very night.
These are little apron skirts made from a tea towel that I found discounted just after Halloween. The girls were very proud of their "baker" skirts.  Since matching my trio is so much fun, my little man has a tie shirt. The tie shirt is a quick ten minute project, but so cute.

Free -- Personalized Bean Bags--Giveaway--

We have a winner!!
Congratulations Amy! You have 72 hours to contact me (until Wednesday at midnight) to leave a comment with your color scheme and email address. As soon as I receive you comment, I will start working and send Maddie her beanbags via USPS. Thanks for entering!!
You can win your own adorable been bags made especially for the clever kiddo in your life!!
Rules to win by:
1. Leave a comment in this post telling what your favorite post on CleverKiddos.com and the name of the clever kiddo you think should win (up to 6 letters)!
2. To receive a second entry- You must blog about my giveaway on your blog, leave a SECOND comment with a link to your blog.(You must blog about it or It will not count as an entry)
3. For a third entry become a follower of CleverKiddos.com and leave a ANOTHER comment.
4. For yet another chance to win refer a friend, have them post a comment noting you sent them.
Good Luck!! This giveaway is open to everyone! I will use random.org to determine the winner. Contest will end on April 24th at Midnight Texas time. The winner will be posted on Monday, April 27th. Good Luck!
If you don't win...enjoy making your own.

Straw Painting

Here is a fun twist on painting. Arm the kiddos with a straw, small cup of watered down paint, and sponge. Make sure you don't put more watered paint in the cup than you are willing to have spilled. Have the kiddos dip the sponge in the watered paint and place in on the paper. Using the straw, blow the paint into a creative piece of art. 
Enjoy!

Tuesday, April 21, 2009

Organizing with kiddos...

In honor of the "be more organized" resolution that we seem to make to ourselves, we are going to talk about organization with kiddos. Organization is only useful when it fills a need. My love for organization comes from the desire that the "have to(s)" take less time, so we can fill our days with the "get's to(s)". Think of your heart's desire before you invest your time and effort.
1. Narrow your target.
Think of where you want to start. Clear your mind of what you want to have done this year, this week, or this millinium. Know that each small change brings more "get to" time to you and your family. Like I tell my kiddos when they ask "Are we there yet?" on a long trip. "We are getting closer every second." Once you start tasting success the desire will grow, but met with frustration the project will end. So we start small, "I want to organize my daughter's dress up clothes." is a much better goal than "I want to organize my kiddo's stuff."
2. Determine your audience.
Simply put, who is going to use the stuff I am organizing. When organizing my kiddo's room I use the 5 minute rule: Can I straighten up this room in 5 minutes? When we had three two year olds we used big tubs and all the toys went in. The toys that were stored in that room had to fit into the tub(s). So, if a toy did not have a special place or fit in the tub we moved it to another room(or house). Now that the little ones are four we have separate tubs for dress-up, babies, and other. We keep special toys where they can't reach. These toys need to be put away properly. One card in not near as fun as a whole deck. So, I get them down for their special playtime and ensure they are put away correctly. Quiet time toys, stored separately with limited access, hold little ones attention better than if they were left out.
4. Be inspired and Start
Inspiration can be found with-in or from other sources. Use your friends, tap into the knowledge of books or internet. I usually do a quick google search before I head to my target area. Just be careful not to buy yet. Get your hands dirty and use temporary storage until you have taken inventory of what you need. Shoe boxes, ziplocks, grocery bags, etc. will do just fine to create your new organization system. I find it less overwhelming to work left to right. One of your most important organization tools will be the trash bag...don't store JUNK! Then go looking around the house before you part with your hard earned dollars for new containers. You may be suprised how many perfect sized containers are waiting to be used.
5. Finishing touches
Now that you know what size and location for the containers, start thinking big. Make your storage work together. I have a few favorites that I use over and over. When I buy small plastic boxes I head to the same place for the same style. All umpteen clear plastic boxes in my house coordinate and fit together. So think big, you may only be buying 5 boxes this time, but think about the variety of uses and extended availablity of that piece. In this project I used the same zipper bags that we use in our homeschool drawer. Now, make sure you have growing room. If you have room but not the need, grab a few extra boxes/bags and leave them empty.
6. Relax and Celebrate
Enjoy the step you have taken and savor the feeling of success. Sometime my best attempts are foiled my little hands. Thus making them more frustrating or more time consuming to keep up than if I would have left it alone. That simply means there is a better solution waiting to be discovered. But, this time when I start I have a bit more knowledge, (of what doesn't work & why) my new solution is bound to be better.
www.cleverkiddos.com
do not reproduce without written permission of author

Wednesday, April 15, 2009

Noodle in a bottle...

A great quiet activity for kiddos of all ages. Although I intended it to be for just the little ones, those clever kiddos had other ideas. I was inspired by the loves school blog and we added our own twist
The little kiddos each got a pan to catch the broken noodles with their goal being not to break any. My youngest son is in need of gentleness training. The boy is a bull in a china shop. LOL Then each kiddo got noodles and a water bottle. To add a challenge, we added tape to the top of the bottle. Very simple, very fun! The big boys decided it was a building project and took it in a direction that I could not have planned.
This activity passed the easy set up, long playtime, and quick clean-up test.

Thinking outside the box...

Here is a very inexpensive activity that all my kiddos LOVE. Collect a bunch of boxes, dig in your recycle bin or head to your favorite warehouse store (we like sams). We got two carts full of boxes for only $1.88 (the price two fountain drinks).... pretty good. The workers are usually very helpful and enjoy helping the kiddos fill the cart. 
Head to the grass and get out your paints, brushes, and paper plates (for the paint). If you prefer the kiddos to be a little less painted coat them with lotion so the paint doesn't "stick" as well. 
Let the kiddo's imagination run wild. Some of our favorite creations range from a grocery store to big baby crib made from a watermelon display box. 
Clean up is easy, fill a bucket with water, add soap, wipe with papertowels, and allow plenty of outside playtime to ensure they are dry.
This "outside the box activity" works well with a groups or makes a very clever birthday party. Just make sure you have plenty of paint shirts on hand, or let them make their own paint shirts as a party favor. White t-shirts with a "My Kiddo's 4th Birthday Party" iron on, splashed with paint during the party make the perfect take home gift. I love SouleMama's idea for an art party too. The aprons are SUPER cute!! 
Our favorite "outside the box party" was when we moved into our new home. After a lot of unpacking, the box party was a special kid-friendly housewarming party! 

Monday, April 13, 2009

A reward to remember...

The kiddos enjoy working toward a goal, and I love having reward ( or reason to change your behavior right now) handy. After my oldest daughter received her first tea set, the kiddos started working together to have a party. This is Abby's chart, after she has 7 stickers in a category we will work on that area of the party. Each kiddo had their own chart and worked on their part of the party. It is fun to see each of them get so excited. Since all the kiddos worked on the party we invited both boys and girls. The girls enjoyed their fancy princess tea party while the boys enjoy their cowboy and indian party.
The chart made this party special on many levels: -they all worked together -they earned and worked for each piece -we get to share a special day with friends.

Egg Carton Fun

Save those egg cartons....So many fun games are just waiting to be created. We enjoyed a matching game with letters, but  numbers, colors and patterns are just a few of the endless possibles. I used bits of felt, but I think paper would have worked a bit better. The kiddos loved using it as a target as well as a matching game....those clever kiddos, I would have never thought of that. 

Friday, April 10, 2009

Sleep Tight Kiddos...

What better way to drift off to dreamland than in special jammies? If you (or your kiddos) are just beginning to explore the wonderful world of sewing, jammies are a great place to start. Your little ones might even be so excited to wear them, they want to go to bed...well OK, they aren't magic. By paring the new shorts with an old t-shirt you gain an inexpensive pair of pajamas and a great way to recycle those stained/ worn out t-shirts. For even more fun, use the scraps of the fabric to surprise the kiddos with matching outfits for their dolls.

Thursday, April 9, 2009

Easy painting with kiddos...

Painting can sometime be an intimidating activity. Visions of your children looking like these may be enough to make your blood run cold. With a little preparation painting can leave little clean up. Painting outside is my first choice, but when done right inside can be just as easy. Preparation is the key, these are the simple step I use to prepare:
  1. First I have a tablecloth to cover the table.
  2. Place a bag of wipes and a small bottle of lotion on the table. I store the table cloth, lotion, and wipes in a drawer next to our table so they easily accessible.
  3. With the table covered I get my tackle box of paint. Paint-shirts, paper cups, disposable plates, paint, and brushes are stored in one tote. Putting the paint on a plate keeps is contained and gives a great pallet for mixing. Best of all I toss it when I am finished.
  4. Just before we start painting I lotion up my little artists hands. This works very well with ink projects too. Hands are so much easier to clean up if lotions is used first.
I let the kids choose their colors for painting, fill their plate and let them get started. Once they begin I place a small (very small) amount of water in their cup and set it on a napkin. I let them paint as long as they are interested, but before they get bored, I start talking about what we do when before we leave our table. As long as they take off the paint shirt and wipe their hands (or have them wiped) with a baby-wipe they are free to get down. We have a line with clips hung in our garage that works well drying the art created outside and prevents them from being blown away. I place the paint back in the tackle box after each squirt, so all I need to do is place the art in a safe place, put the napkin in the cup and toss the paper products. A quick rinse of the bushes and a roll of the tablecloth completes our art project.
The pictures above were taken when oldest son was young. These are a few of his friends that had come over to play. After a good coat of lotion, they took off clothes that couldn't get paint on them and replaced them with ones that could. I gave them each a color and they covered themselves, the paper, and each other with it. I had a roll of newsprint unrolled in the back yard and they walked, crawled, ran, patted, and rolled on the paper. They had a blast and after a spray with the hose and quick towel dry they were ready for the next activity. I let the sun dry the painting and sent home a section with each boy.

Monday, April 6, 2009

making letter beanbags

Here are cute little of personalized beanbags that any kiddo will enjoy. We love playing number and cooridination games with out last set and can't wait to see them enjoy their letters. These make great gifts paired with a cute little drawstring bag. They are so easy I almost didn't include directions, but it is always nice to see it step by step before you dive in. 
Here is how we made the personalized bean bags:
Choose one color for all of your letters (so you don't have to keep changing thread) and cut out letters. You can use your computer to print letters and cut them and the felt at the same time. Or just freehand the letters and enjoy their diversity. Decide on the color beanbags that you would like You can cut three bean bags from each sheet, cut out two 4 X 8 inch strips and one 3.5x7 in strip. Fold the strip in half and position your first letter, sew letter to strip. Repeat until you have stitched all your letters. Fold the beanbag so the letter is facing out and stitch around the edge leaving a 1 inch opening. Fill the bag with beans (I like lentils). My kids enjoyed getting involved by using the funnel to fill each bag.   stitch the opening closed and begin enjoying your beanbags.
Supplies needed: colored felt sheets, sewing machine, thread, and beans (I like lentils)

one sock wonder...

When a pair of socks really love each other one must go and hide. For indeed if they truly love their mate, they let go. They let go in order to allow their mate to become a sock puppet. After all can you think of a lovelier life for a sock?

Thursday, April 2, 2009

get that kiddo sewing: how to introduce children to the world of sewing

Getting kids started on their sewing adventure is as 1,2,3.
1. Select fabrics that are very easy to sew, will not ravel, and look the same on both sides. I suggest fleece or felt.
2. Give them a framework like people, bean bags, felt food, but let them design their own project. I love etsy.com to get their minds rolling. I have found that sometimes they insist on the most difficult, that is OK just remind them that is their "inspiration" and not their pattern. I try to make a sample while they are sewing , without being a demonstrator. It helps them see the basic idea in practice,.
3. Get out the sewing machine (or needle and thead) and sew with them. Make sure the project is quick and easy. Who wants to cut out 20 pieces, arrange, and pin before the project starts to takes shape? With felt the seams can be on the inside or outside so let thier imagination run free. As they start to enjoy the freedom a sewing machine has to offer they will begin to figure out/learn the rules about pinning, patterns, and where the right sides of the fabric go. I start by letting them push the petal as I work the fabric, before long they are running the machine better than I am. :)
When the sewing machine become a tool for them to create, their imagination and interest begin to soar. Avoid the trap of "this is how you sew a straight line" and let them experience the joy of homemade.
Happy Sewing!