Saturday, August 29, 2009

How to: homemade bag tag ... you can do this!

When it's time to send them into the classroom with their big girl/boy backpack it's fun to add a little touch of love on the front.We have joined a co-op that meets one day a week, so I tagged each of my kindergartners with a little extra label of love. This project can't be easier! 
1. Find a design you like or hand write your kiddo's name (better yet, let your kiddo write their own name) on a piece of card stock. The size doesn't matter, but I like the look of 4inch by 2inch tags. For the diaper bag tag I used the same design for both sides, but the kinder tags I used scrapbook paper on the back.
2. Cut both sides of your tag the same size. Set the two pieces (blank sides touching) inside a self laminating paper or pre-cut bag tag, follow the directions and peel off the excess paper while sealing the tag/page.
3. If you have used the self laminating paper cut around the label (leaving at least 1/4 inch clear laminate around paper. Use a hole-punch and cut a hole in the tag, and add string/ribbon. The tags hang a bit nicer if you fold the string in half and insert the loop side thru the punched hole and tread the other end  thru the loop. If you have used the pre-cut bag tag you can skip this step and just add the enclosed plastic strap.4. Hang in on your kiddo's bag and watch as their face lights up knowing that Momma labeled them with love. 
These make a great label for any type of present (especially christmas). What grandma could resist having a one of a kind baggage tag hand written by her grandkiddo? If you are using it as  a luggage tag, I suggest you make it a bit smaller to increase the durability and reduce the chance of it getting torn off while the luggage is being moved.
Happy Labeling..I was going to say tagging, but that has a whole new meaning. :)

Wednesday, August 26, 2009

Displaying kiddo artwork...

Keeping special artwork in a visible place is an easy way to remind your kiddos how much you value their creativity. We had a few extra boys over to spend the night and this was one of their creations. Outside painting is a great activity when friend come over to play. We have talked about it before, but I think it is worth repeating. Paint is not something to be scared of, with the right prep it can be a fun and easy activity. And what kiddo doesn't love to paint? I love that our guest's mom hung up the special flag at home. My boys were so proud when they heard that the flag was hanging in their house. What a fantastic way to remember a great day! 

Tuesday, August 25, 2009

How to: bleach design t-shirts..you can do it!

It doesn't get much easier than this! The kids loved creating their own special shirt. Although we followed the same steps, each shirt has it's own look.
Supply list for this simple kiddo craft: Freezer paper, Scissors or razor blade, Pencil or pen, Stick-on letters (if you want words on your shirt),  Iron, T-shirt (any color but white, but darker colors work the best), spray bottle with 80% bleach 20% water, container for rinsing shirt
1. Allow the kiddos to draw a design for the shirt on freezer paper (the non-wax side)
2. Cut out the design and iron it onto the shirt (wax side to shirt). Once the design in cool, allow them to add sticker letters if desired. 
(not sure why he chose "story lover", but glad he loved it!)
3. Lay the shirts out in an area that is safe to spray bleach. Make sure your container (or bowl) of clean water is ready so you can dip the shirt after you spray. Spray the shirt with a 80% bleach/20% water solution. I used an old no more tears bottle that had been cleaned.
4. The longer you leave the bleach on the shirt the lighter the shirt will become. The more bleach you use the greater the contrast. This one had a lot of bleach and sat for about 1 minute before rinsing. When you have the desired color change dip the shirt in the clean water and rinse throughly.
5. Peal off your design and letter and allow it to dry in the sun. This shirt we used less bleach and only let it sit for about 30 seconds. As it dries the color change will be more evident (see picture below for final product).  
6. If desired turn the shirt over and add another design or just mist with bleach solution to match the color of the front. Once you dip in the water you can allow it to dry in the sun or wash it immediately. I used a color catcher when I washed all five shirts together. After the first wash the smell of bleach was still strong, but after the second wash and dry they were ready to wear.
7. Let the kiddos enjoy their new creation.
This is great for old t-shirts that have seen better days, and I just love this twist on the same basic idea.

Tuesday, August 18, 2009

Getting a grip on dinner..Week 3&4

The new calendar is here! Congratulation on completing your first two week of your "getting a grip on dinner" meal plan. The hardest weeks are behind you and come FANTASTIC recipes are before you. Enjoy! This system has made such a big difference in my family I am excited to hear if you enjoy it too. Happy mealtime!

Saturday, August 15, 2009

Getting a grip on dinner..Week 1&2

The first two weeks of the meal plan is here!  In the first two weeks with get you will be become acquainted with the wonderful feeling of "having a grip on dinner." I hope you enjoy the feeling as much as I do. It feels good having an arsenal of great mealtimes at your fingertips! Being prepared makes a day feel comfortable. I love being able to share a special meals with ease. If I know friends are coming to play , I just defrost one of our frozen meals. It is often easier than making sandwiches and oh so much yummier. If a friend just had a new baby, bring a few frozen meals. Homemade frozen meals are so convenient. Their family can enjoy them on their own schedule and savor the feeling having an easy meal waiting in the freezer. You may just bring a smile to another mom's face at the end of "one of those days" when she can serve a delicious homemade meal with minimal effort. The directions for cooking the meals are listed at the top of each sheet. I find helpful are planning my grocery shopping trip so that I can cook when I get home. If I go ahead and start the meat cooking when I get home, I find things go much smoother. I may have to put the meat in the refrigerator until I can prepare the recipes, but I feels good to have a key to success complete. I have not made any meal plans for the weekends. It is a great week , but doesn't ofent happen that we eat at home seven days a week. Shift the meals to fit your schedule. If you eat at home three times a week, this plan will last longer for you. Enjoy and celebrate your familie's schedule, this meal plan allows for easy customization. Each family also consumes different amounts of food, so what makes three family meals for you may only give me two. Just make sure you are freezing the right size for your family and customize where you need to. Likewise, if you miss a day here or add a lunch there the basics stay the same, enjoy and savor your homemade meals!

getting a grip on dinner...pre-made shopping list

Walking through the grocery store collecting stares the friendly "boy, you have your hands full" greeting is no place to be making decisions or organizing a list. So that should be done in the peace and quiet (chuckle) of my home. The grocery list are organized to include the following categories: produce, dairy, meat, frozen, beauty/paper, and other. If you keep a list on the fridge, divide it into the same categories. As you fill in the items, you will be making your shopping trip more pleasant with each pen stroke. The grocery store is divided into departments, make your list fit the store. It is much easier standing in the dairy department knowing you need cheddar cheese and milk than figuring out you forgot the cheese when you are at the check-out line. Or, even worse making the discovery when you are preparing a meal. Bringing a pen helps if you mark things as you buy, but scanning the entire list in each department waste precious time. The best foods are in the perimeter of the store. Wendy Boswell says is well, "That's where all the fresh foods are. The less you find yourself in the central aisles of the grocery store, the healthier your shopping trip will be. Make it a habit—work the perimeter of the store for the bulk of your groceries, then dip into the aisles for staples that you know you need." By using the divided list, it is evident when when I am taking to many dips into the aisles. The meal system shopping list for the first week looks like this: Please remember the first two weeks may be a little more expensive and time consuming than the other weeks because we are beginning to stock our dinner arsenal (freezer). Stick with the program, the reward is great! As a little bonus... this is the matching fridge list. Simply cut in half and use a magnetic clip to keep in on the fridge. Enjoy! P.S. I am excited to share this system. Please leave me a comment, let me know if you have any suggestions to make it better or what part you enjoy the most. Tell a friend, too.

Thursday, July 30, 2009

semi-homemade: how to make new clothes from old ones

The girls and I worked on the outfits they earned for the fancy Nancy tea party. We recycled-that is a fancy way of saying we used old clothes and material- to make our version of a fancy Nancy outfit. These are homemade-that is a fancy way of saying filled with love. I'm not very fancy so they are a bit tame, but with the right hat, boa, and gloves they will be perfect party apparel.

charting progress...

I love charts! Not because they look cute, but the peace they bring my household. We are currently enjoying the tea party chart. There are a few reasons this chart has worked so well for us. The first is that the rewards are quick. My kiddos don't have the attention span to work six months on a big prize. They only have to earn seven stickers for each part of their reward. The kiddos also go "outside the lines" and use their stickers at bartering tools with each other. I will clean your room for you if you give me two of your stickers, etc. Secondly, the kiddos feel like they are part of a team. Since they are all working toward the same reward (tea party) they have enjoyed talking and planning their contribution. Noah is very excited about cupcakes while Abby can't wait for brownies. They have been very encouraging to each other,"Becca, just one more sticker and I will help you make a cake." Most importantly, I have a easy reward/discipline. When they get in the car, buckle up, and are kind to one another they each get a sticker. But, if I hear an unkind word I will remove one of their hard earned smiley face stickers. We don't set up clear guideline about what constitute a sticker, so the kids will often ask if I _______ can I get a sticker? We don't have a set time frame for each chart, we just make a new one when they loose interest. Generally we have a new type of chart every other month. Some stick around longer than others, we still uses the reading club chart that we started back in November. I make my charts in photoshop, because I like the way they look. This is a blank, ready for your imagination and pen to make it fit your household.Happy Charting!!

Tuesday, July 21, 2009

dog gone

Dog gone...these appliques are so much fun. 
There are just a few outfits that I really love, but this little dog has stolen my heart. I have been counting down the days to seeing the twins in their new outfits. They are old onesies that the applique gave a new life. Remember how simple appliques are to make?
 The same pattern on different items makes an adorable set for you or gift for a friend.

Sunday, July 19, 2009

semi-homemade: how to applique & make baby pants

Once you start doing these appliques you won't be able to walk around your house without seeing something in "need" of enhancement. :) Remember the tie shirt? That is one of my favorite appliques. These directions start with the legs to some pants that I made into shorts for my seven year old son. You can use any material but old pant legs are really easy to make into baby pants so we will walk through both.
For the pants:
1). Once the legs are cut off, measure the length of your desired pants and add one inch ( for the waist band).
 2) Cut the pants so that you have a "U" shape cut out when they are side by side. Turn the fabric good sides together and sew together.  Turn the pants right side out and fold down the top to create a waist band. You can add a little elastic or a flap of velcro. So easy and (kinda) homemade. :)
For the applique:
1) With the scraps (or any fabric you would like to use), iron on wonderunder. Ask for it at the fabric store if you haven't used it before. Trace your design (backwards) on the paperbacking and cut out your design. For a world of great ideas try etsy. 
2.) Remove the paperbacking and iron it to your shirt. Stitch around the design, you can use a zig zag like I did for this one or a straight stitch like I did on the tie shirt.
We are headed to VBS this week and just hate to pass up an opportunity to dress for a theme.  So the oldest boys and I went to a local thrift shop and found these camo pants for $4.  I stopped by a craft store and picked up the thread, velcro, and onesies for $12. Then grabbed a t-shirt from Jo Jo's closet. $14 spent, and we get to enjoy two matching onesies with a coordinating big brother t-shirt, one pair of shorts, and one pair of baby pants. Not bad!

Tuesday, July 14, 2009

a pillow for the toothless...

Another front tooth lost, and this time we were ready with this cute little tooth pillow. The center of the "a" has a little pocket. Safely tucked in, the little tooth waits to be joined by a dollar tonight.
The pillow is very easy to make:
  1. Cut two squares of fabric and one square of stabilizer (available at most fabric stores) the size of your desired pillow
  2. Iron on "wonder under" (available at most fabric stores) on to your accent/letter fabric.
  3. Trace or draw you letter onto your fabric and cut it out.
  4. Using fabric to match the front of your pillow (be aware of your pattern so it matches) about .5 inches wider than the opening in your letter and double the height +.5 inches of your desired pocket
  5. Place the pocket on your pillow fabric and lay the letter over ensuring the pocket in under  the letter and trim as necessary. You want the pocket edges to be anchored under the letter.
  6. Iron the letter in place which will temporally hold the pocket in place too.
  7. Place the stabilizer on the back side of the front of the pillow, and use a zig zag stitch around the letter.
  8. Place the good sides of your pillow together and stitch around the edges leaving an opening to add stuffing.
  9. Stuff the pillow. I like recycling old pillows that are ready to be replaced by cutting them opening and using the stuffing.
  10. Stitch the opening with a straight stich and start enjoying your pillow.Since there are only so many teeth to be lost, the day to day use for this pillow will be aromatherapy. We will place drop or two of lavender on a cotton ball tucked in the pocket and enjoy the benefits of essential oils.

Monday, July 13, 2009

50 foot slip-n-slide with sling shot

I have been envisioning creating a 50 foot slip-n-slide in our yard. Saw one on Jessica's blog with a rope to sling shot the kiddos at blistering speeds down the slip-n-slide. Oh this is something we have to try!! :) 
So I stop at the local big box home improvement and pick up a big plastic tarp and start calling/emailing friends last night. Well, I bought the wrong tarp, I couldn't find the stakes, but we made it work. When we make it again, this is what we will use:
  • 1 or 2 large plastic tarp (at least ten feet wide)- the kids could all make it to the end of our fifty foot slide
  • stakes to anchor it to the ground
  • 2 or 3 bottles of  baby soap (so it doesn't hurt their eyes)
  • hose and water (we used a spinkler and hose to keep it nice and wet)
  • rope or elastic band to sling shot the kiddos
The preparation is easy, lay out the tarp and stake the edges down. We used wood but, stakes would have worked better. Pour on the baby soap to make it extra slippery, then add water. Make sure the slide stays nice and wet.
Be careful and have fun. This is a great group activity, can you already see your small group, moms group, or close friends on he slide. Jessica said a friend used it for  birthday party. Oh fun!

Friday, July 10, 2009

homemade baby food...

I have a new toy. I loved making homemade baby food for my older kiddos, but it was wasn't this easy. This is a Kid Co food mill. I have to say, I love this thing.  I bought this one from baby earth. If you use the referral code  g0kKuz you save $5. This and a few storage containers will be all you need to serve the best homemade baby food. 
Just place the food in the middle and push down as you turn the handle. My seven and eight year old can even make homemade baby food with this mill. I put the extras in a container to freeze for days that we are on the go. OK, really it is for days when we are eating fast food and there isn't anything that I am willing to grind up and feed to the babies. :) The mill comes with a carrying case and spoon so it is easy to stick in the diaper bag and you can serve it right out of the top. No worry of kids cutting themselves if they get into the diaper bag, there is no sharp blade. My favorite part is that it is sooo easy to clean. Everything in life should be this fun and easy. :)
When I made homemade baby food in bulk (lots of flavors in one day) for my older ones I just put it in ice cube trays to freeze and stored them in a zip loc. I am going with single serve containers to save a step this time. There are lots of great babyfood recipe books, but I just follow the basic rule of raw fruit, cooked veggies. 
Happy Baby Food Making!!

marking their territory...

A proper garden must be outfitted with plant markers! With the idea of fashion over function, few of these markers actually label plants. The kids had fun creating these wooden markers to adorn the squash, lettuce, sweet peas, spinach, and sweet potatoes. Since they had fun, these are the best plant markers in the whole world in my eyes. If you are in Texas this is a great website that helped with our plant selection.

Thursday, July 9, 2009

just the right spot...

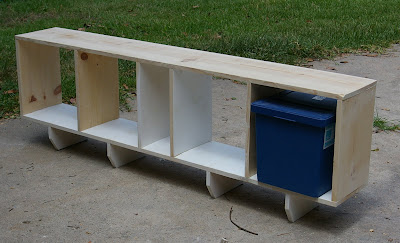
We have this fun little niche in a hallway that we use to keep our "Mommy's Magic bags". One of my favorite ways to turn a moment that I am thinking of going bald with my own two hands into a great time with the kiddos. I finished the bags back in December, but there was just alway something missing. Eureka...A bench with even more room for pre-packaged activities.  I found the storage containers that I wanted to use and waited for the perfect bench to grow around them. But, no bench grew and I couldn't find one right size with a price tag that I could swallow.  You know what they say, if you want it done right (or you are too cheap to buy the one from that speciallity store that is really cute) you have to do it yourself.  So a couple of 1X12, a little plywood, and a few coats of paint later...tada!I wanted a little personality since it was a kiddo area, but didn't want it to look like we live at a preschool. So I stole this idea from my sister (the queen of everything cool looking) and added a little fabric to the back. I "laminated" with a peel and stick product from a fabric store. I had actually bought it to make bibs, but I am very happy with the final resting place. So easy, but what a change. 
Hum...think it might still need a cushion....to be continued.

Monday, July 6, 2009

Birthdays...

I just love birthdays! What a special time to enjoy looking back, looking forward, and savoring today. We have a few traditions that have developed over the years. 
1. We give the kids 
a choice on their birthday to either A: have a big blowout birthday party with all their friends, B: take a weekend trip with on their own with one parent, or C: take a weekend trip with the entire family.  This
 starts around age 4, but is
 really enjoyed at age 5+. The kids talk about it all year and usually change there minds often and dream big. Our youngest daughter invites and disinvites other family members to her birthday
 celebration (including her twin)throughout the year depending if she likes their behavior or not. 
2. Each of the kids enjoy
 making something for the birthday kiddo. Gifts range from drawings to sock puppets, but each one is filled with love and thoughtfulness. The exchanging of these gifts is
 usually a very special and often touching time.
3. The birthday fairies come to decorate. Either the day before or while they sleep the other kiddos (with help) decorate the room of the birthday kiddo. We
 keep a decoration box that the kiddos usually pick from, but when parents are unprepared a roll of toliet paper and construction paper chains work well. 
4. Birthday Princesses/Prince wear their crowns. The girls have special birthday tiaras that they wear on their special day.
 Since one of the girls has a twin brother we have a special crown for him as well. :) 
5. Leave the icing off. When serving birthday cake we leave the icing off and serve each slice with a scoop of icing and a dash of sprinkles.
 That way each kiddos has the fun of decorating their slice and no arguments over who gets what piece.  Everyone wins, not to mention one less job for mommy on the special day.
6. Sleep where you want. The birthday kiddo gets to choose where they sleep after the big day. They are usually accompanied by at least one sibling and talking is usually not kept to a minimum. We made the mistake of doing this the night before the birthday but after one grumpy birthday boy we decided this was a better way to end a special day.
We just celebrated our 30th kiddo birthday last week. I can't wait to see what the birthdays look like after 30 more, according to my calculation that should be in about 4.5 years. 

Wednesday, July 1, 2009

Cream Cheese Brownies

Yummy! This is one of our favorite deserts. 1 pkg. Super Moist Devil's Food Cake Mix
8 ounces cream cheese, room temp.
1 egg
1/2 cup sugar
1/2 cup chocolate chips
White and Chocolate Frosting (optional)
Heat oven to 350 degrees. Grease and flour a 15 1/2 X 10 X 1 jelly roll pan OR 9X11 pan. 9X11 takes a little longer to bake. Prepare cake mix as directed on package. Pour batter into pan. Mx cream cheese, egg, sugar, and chocolate chips together. Drop by spoonfuls into batter. Cut through with butter knife to get marbled effect. If you want a few extra chocolate chips sprinkle them on top. Bake until toothpick comes our clean 25-35 minutes. Cool and drizzle optional white frosting and then chocolate frosting. Cool and cut into squares. This recipe freezes well but, doesn't last long in our freezer. (ha ha) I usually at least double the recipe. This was a big hit with kiddos and adult alike. For one of the girl's tea parties, I added a little red food coloring to the cream cheese mixture so it was pink. :) Pink and chocolate, does it get any girly girl than that? Enjoy!!